This article is meant to be a short walkthrough on how to quickly setup a local development environment using Docker, a better alternative to installing a full LAMP stack such as XAMPP on your machine. This is not a full tutorial on Docker though, I just find this method works the best for me when developing Laravel apps.
Here’s the GitHub repo for all the code below, you can clone it for easier deployment. https://github.com/chiefofstack/docker-boilerplate
What is Docker and what are we going to create anyway?
“Docker is a tool designed to make it easier to create, deploy, and run applications by using containers. Containers allow a developer to package up an application with all of the parts it needs, such as libraries and other dependencies, and ship it all out as one package.”
– opensource.com
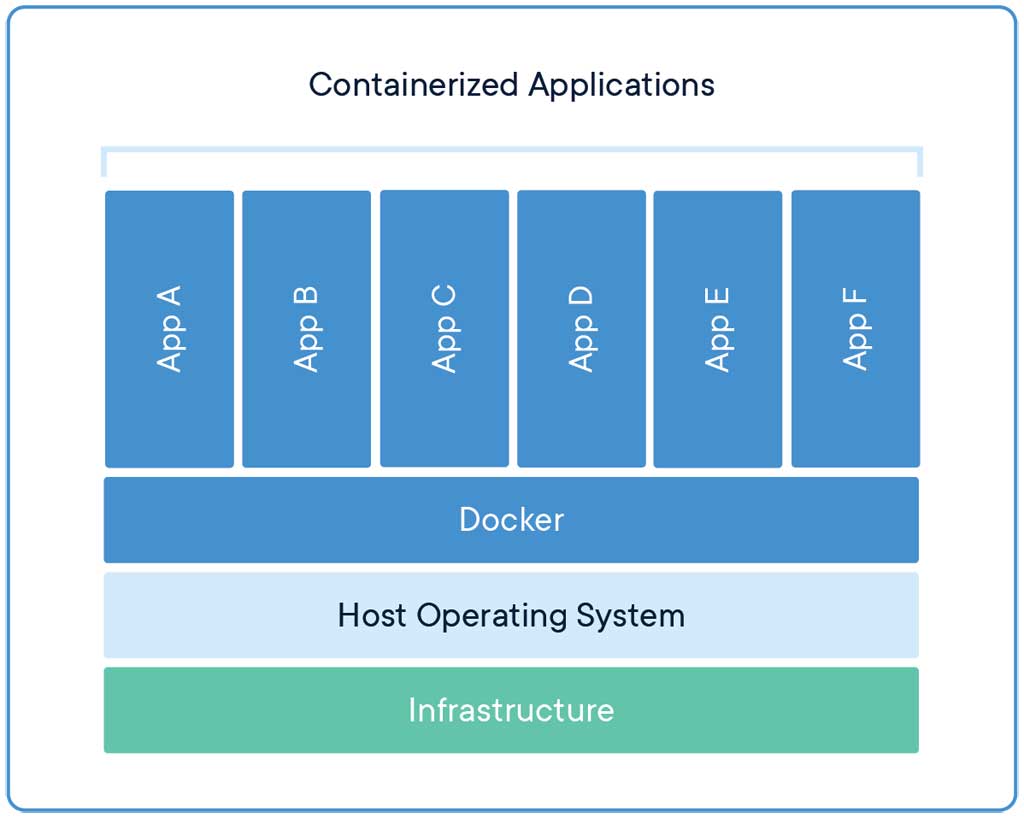
Photo from: docker.com
In a nutshell, we can think of Docker as a lightweight virtual machine that can be easily deployed across any environment together with all the configurations. This guarantees that your application will run precisely how it’s intended whether it is in production, staging or in a development environment.
That’s it, we will create service containers for our entire stack. Let’s get started!
Step 1. Install Docker Desktop
If you are a Windows user, download and install Docker for Windows using this link. Docker Desktop has a built in tool called docker-compose which we will utilize to link our services/containers together.
“Compose is a tool for defining and running multi-container Docker applications. With Compose, you use a YAML file to configure your application’s services. Then, with a single command, you create and start all the services from your configuration.”
– docker.com
Note that you need WSL 2 configured on your Windows machine before you can install this app.
Step 2: Create individual containers for each of our services
Cd into your project directory and run the following commands in your terminal (for this example I used /home/myuser/Sites/awesomeproject.com). these are basically all the files/folders that we need:
$ touch docker-compose.yml
$ touch Dockerfile
$ mkdir src
$ mkdir mysql
$ mkdir nginx
$ touch nginx/default.conf
Your file structure should look like this.

Edit docker-compose.yml and define our networks
version: '3'
networks:
    laravel:
Next we define the services we will use for our stack. For NGINX add the following code, this will make the server accessible through port 1010. We also mapped the configuration file to default.conf file found in our nginx folder.:
services:
    nginx:
        image: nginx:stable-alpine
        container_name: nginx_awesomeproject.com
        ports:
            - "1010:80"
        volumes:
            - ./src:/var/www/html
            - ./nginx/default.conf:/etc/nginx/conf.d/default.conf
        depends_on:
            - php
            - mysql
            - phpmyadmin
        networks:
            - laravel
Then edit nginx/default.conf and add the following code:
server {
    listen 80;
    index index.php index.html;
    server_name localhost;
    error_log /var/log/nginx/error.log;
    access_log /var/log/nginx/access.log;
    root /var/www/html/public;
    location / {
        try_files $uri $uri/ /index.php?$query_string;
    }
    location ~ \.php$ {
        try_files $uri = 404;
        fastcgi_split_path_info ^(.+\.php)(/.+)$;
        fastcgi_pass php:9000;
        fastcgi_index index.php;
        include fastcgi_params;
        fastcgi_param SCRIPT_FILENAME document_root$fastcgi_script_name;
        fastcgi_param PATH_INFO $fastcgi_path_info;
    }
}
For PHP edit docker-composer.yml again and add the following code. Like the NGINX service above, we prepend the service name php_ for our container_name, used a unique port 1000 so it doesn’t interfere with other local ports in our system and linked it to our container using the ‘laravel’ network. We also added a custom docker file ‘Dockerfile’:
   php:
        build:
            context: .
            dockerfile: Dockerfile
        container_name: php_awesomeproject.com
        volumes:
            - ./src:/var/www/html
        ports:
            - "1000:9000"
        networks:
            - laravel
Edit Dockerfile and add the following code, this will install php: 7.4-fpm-alpine and also install php extensions.
FROM php:7.4-fpm-alpine
RUN docker-php-ext-install pdo pdo_mysql
For MySQL add the following to docker-composer.yml. Here we defined the MySQL credentials that we will use in our Laravel installation. And just like with the previous two service, we linked them up using the “laravel” network
    mysql:
        image: mysql:5.7.22
        container_name: mysql_awesomeproject.com
        restart: unless-stopped
        tty: true
        ports:
            - "1306:3306"
        volumes:
            - ./mysql_awesomeproject.com:/var/lib/mysql
        environment:
            MYSQL_DATABASE: homestead
            MYSQL_USER: homestead
            MYSQL_PASSWORD: secret
            MYSQL_ROOT_PASSWORD: secret
            SERVICE_TAGS: dev
            SERVICE_NAME: mysql
        networks:
            - laravel
There you go, if all you want is a basic LEMP stack you can skip to the next step. But in order to make our dev environment even more complete I recommend you go ahead and install the following tools.
We will configure Artisan, the command-line interface included with Laravel. It provides a number of helpful commands for your use while developing your application.:
    artisan:
        build:
            context: .
            dockerfile: Dockerfile
        container_name: artisan_awesomeproject.com
        volumes:
            - ./src:/var/www/html
        depends_on:
            - mysql
        working_dir: /var/www/html
        entrypoint: ['/var/www/html/artisan']
        networks:
            - laravel
We will add Composer, a dependency manager for PHP:
    composer:
        image: composer:latest
        container_name: composer_awesomeproject.com
        volumes:
            - ./src:/var/www/html
        working_dir: /var/www/html
        depends_on:
            - php
        networks:
            - laravel
Next we add Node Package Manager. NPM is a package manager for JavaScript.
    npm:
        image: node:13.7
        container_name: npm_awesomeproject.com
        volumes:
            - ./src:/var/www/html
        working_dir: /var/www/html
        entrypoint: ['npm']
        networks:
            - laravel
I also love to use PHPMyAdmin, a free and open source administration tool for MySQL and MariaDB.
    phpmyadmin:
        image: phpmyadmin/phpmyadmin
        container_name: phpmyadmin_awesomeproject.com
        restart: always
        depends_on:
            - mysql
        ports:
            - 1011:80
        environment:
            PMA_HOST: mysql
            PMA_USER: root
            PMA_PASSWORD: secret
            PMA_ARBITRARY: 1
        networks:
            - laravel
Your docker-compose.yml file should look like this.
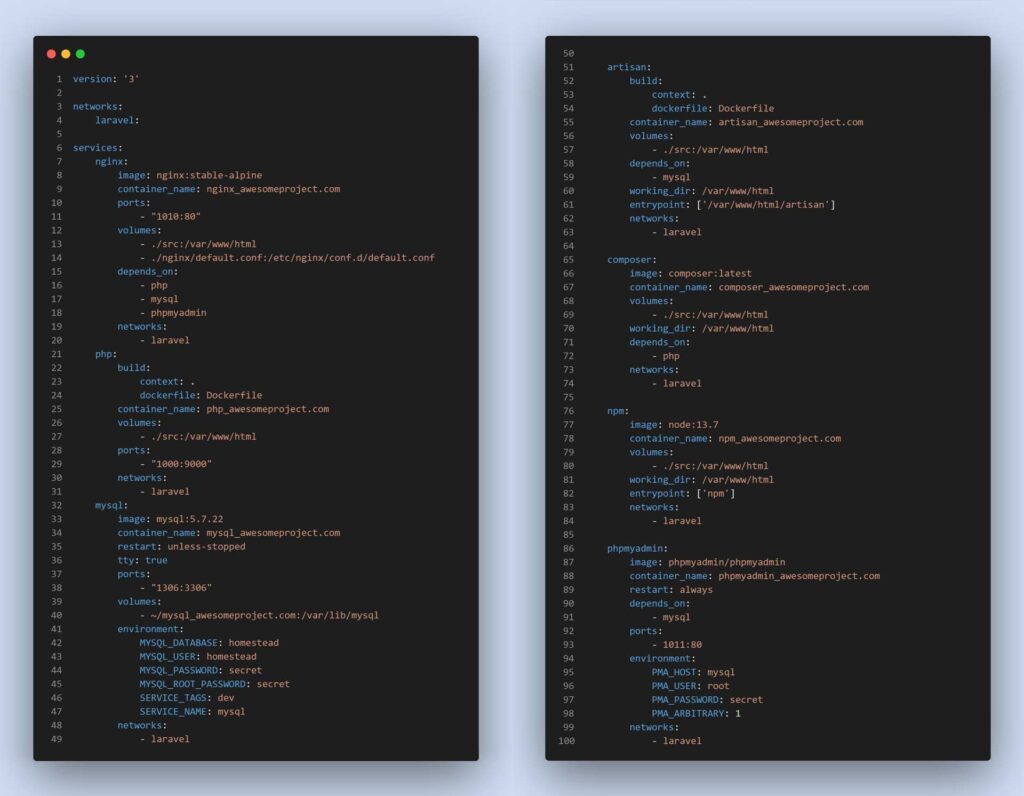
With this file we were able to link our containers using the network “laravel”, added volumes to each of our containers and defined the images to be used when we run it later. Those images are available from the Docker library. We were also able to install tools necessary for a better Laravel development experience.
Step 3: Run the containers and access it locally
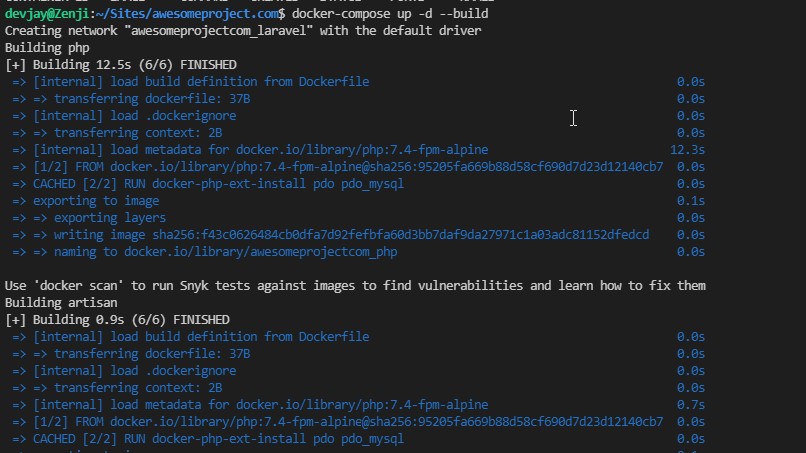
In your terminal run the following in your project folder, this will build and run the containers all in one go. Note that Artisan will fail to run but we will solve that on the next step:
~ docker-compose up -d --build
To test, run this command to list all running containers:
~ docker ps/

You can then check http://localhost:1010 to see if the NGINX server is properly running, right now we don’t have a placeholder index.html there so it will naturally return a 404 error

To be able to see the database go to http://localhost:1011, where you will see PHPMyAdmin

You can connect to mysql through the terminal as well with this code:
~ docker-compose exec mysql mysql -u root -p

Lastly, you can take the containers down using the following commands:
~ docker-compose down

Final Step: Install Laravel and test the tools
If you’ve gone this far you would’ve encountered an error when we ran the artisan container earlier. It’s because we do not have Laravel installed in the /src folder yet. We will do that now, cd into your /src folder and run the following composer command:
~ composer create-project laravel/laravel .

Configure the .env file to match the MySQL credentials we defined earlier in docker-compose.yml. Your .env file should look like this.

To install a Laravel package using Composer run the following command (we’ll install Socialite for this example):
~ docker-compose run --rm composer require laravel/socialite

Let’s now test how to compile assets:
~ docker-compose run -rm npm run dev

Let’s test Artisan by issuing a migrate command:
~ docker-compose run -rm artisan migrate

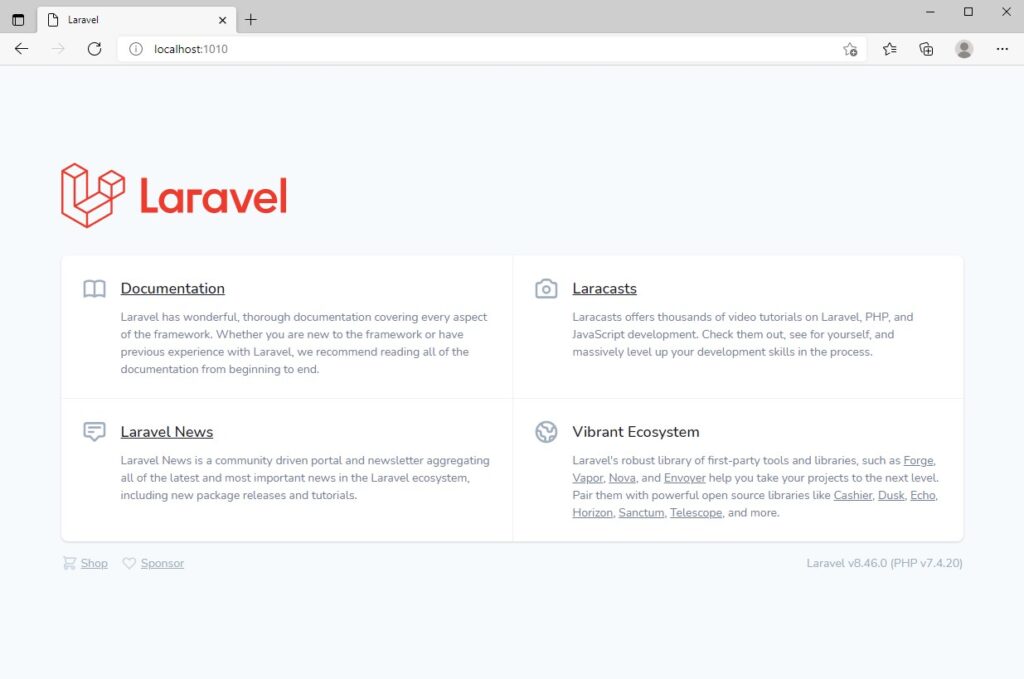
Go back to your browser to test the Laravel installation:
Bonus Step:
I edited my Linux .bashrc file and added “dcr” as an alias for “docker-compose run -rm” command.

This will make it easier to run the tools using the following shorthand “dcr npm run dev”, “dcr artisan migrate”, “dcr composer install”.
SOURCES:
https://opensource.com/resources/what-docker
https://docs.docker.com/compose/

